Search

Sunday, June 27, 2010

How to Answer The 64 Toughest Interview Questions

General Guidelines in Answering Interview Questions

Everyone is nervous on interviews. If you simply allow yourself to feel nervous, you'll do much better. Remember also that it's difficult for the interviewer as well.

In general, be upbeat and positive. Never be negative.

Rehearse your answers and time them. Never talk for more than 2 minutes straight.
Don't try to memorize answers word for word. Use the answers shown here as a guide only, and don't be afraid to include your own thoughts and words. To help you remember key concepts, jot down and review a few key words for each answer. Rehearse your answers frequently, and they will come to you naturally in interviews.

As you will read in the accompanying report, the single most important strategy in interviewing, as in all phases of your job search, is what we call: "The Greatest Executive Job Finding Secret."

And that is...

Find out what people want, than show them how you can help them get it.
Find out what an employer wants most in his or her ideal candidate, then show how you meet those qualifications.

In other words, you must match your abilities, with the needs of the employer. You must sell what the buyer is buying. To do that, before you know what to emphasize in your answers, you must find out what the buyer is buying... what he is looking for. And the best way to do that is to ask a few questions yourself.

You will see how to bring this off skillfully as you read the first two questions of this report. But regardless of how you accomplish it, you must remember this strategy above all: before blurting out your qualifications, you must get some idea of what the employer wants most. Once you know what he wants, you can then present your qualifications as the perfect “key” that fits the “lock” of that position.
  • Other important interview strategies:
  • Turn weaknesses into strengths (You'll see how to do this in a few moments.)
  • Think before you answer. A pause to collect your thoughts is a hallmark of a thoughtful person.
As a daily exercise, practice being more optimistic. For example, try putting a positive spin on events and situations you would normally regard as negative. This is not meant to turn you into a Pollyanna, but to sharpen your selling skills. The best salespeople, as well as the best liked interview candidates, come off as being naturally optimistic, "can do" people. You will dramatically raise your level of attractiveness by daily practicing to be more optimistic.

Be honest...never lie.

Keep an interview diary. Right after each interview note what you did right, what could have gone a little better, and what steps you should take next with this contact. Then take those steps. Don't be like the 95% of humanity who say they will follow up on something, but never do.
About the 64 questions...

You might feel that the answers to the following questions are “canned”, and that they will seldom match up with the exact way you are asked the questions in actual interviews. The questions and answers are designed to be as specific and realistic as possible. But no preparation can anticipate thousands of possible variations on these questions. What's important is that you thoroughly familiarize yourself with the main strategies behind each answer. And it will be invaluable to you if you commit to memory a few key words that let you instantly call to mind your best answer to the various questions. If you do this, and follow the principles of successful interviewing presented here, you're going to do very well.

Good luck...and good job-hunting!

For questions and answers .... See next post
Friday, June 18, 2010

Top 100 Software Testing Blogs

Here it is at last: my first Top 100 of Software Testing Blogs. For those who would like to read more on Software Testing and QA, I created a list with 100 of the best - or at least most popular - Software Testing Blogs in the world. This should definitely give you enough reading!

I ordered this list by gathering several metrics of each blog, to be more precise: the Google Pagerank, Alexa Popularity, Technorati Authority, number of comments and number of sites linking to it.(Note: Not all statistics were available for each blog. Where a statistic was missing, the blog in question simply scored 'neutral' for that statistic).
You can read the algorythm I used to rank the blogs at noop.nl. Many of the results were gathered automatically using my Pagerank Checking script.

Enjoy the list and please let me know which blogs I forgot!


#SiteAuthor
1James Bach's BlogJames Bach
2Testing at the Edge of ChaosMatt Heusser
3Agile Testing Grig Gheorghiu
4Martinfowler.comMartin Fowler
5Tester Tested!Pradeep Soundararajan
6Testing BlogGoogle Testing
7Cem Kaner's BlogCem Kaner
8Miško HeveryMiško Hevery
9DevelopSenseMichael Bolton
10Sara Ford's WeblogSara Ford
11Steve Rowe's BlogSteve Rowe
12Test ObsessedElisabeth Hendrickson
13Software Quality Insights ( various )
14Exploration Through ExampleBrian Marick
15Gojko AdzicGojko Adzic
16Thinking TesterShrini Kulkarni
17Chris McMahon's BlogChris McMahon
18JW on TestJames Whittaker
19Software testing helpVijay
20Corey Goldberg Corey Goldberg
21Quality FrogBen Simo
22Testing Hotlist UpdateBret Pettichord
23AbakasCatherine Powell
24Collaborative Software TestingJonathan Kohl
25Sbarber's blogScott Barber
26Adam goucherAdam goucher
27Eric JarviEric Jarvi
28Karen N. Johnson's blogKaren N. Johnson
29Test GuideMichael Hunter
30Curious TesterParimala Shankaraiah
31Testy RedheadLanette Creamer
32Antony Marcano's blogAntony Marcano
33All Things QualityJoe Strazzere
34I. M. Testy Bj Rollinson
35Software testing zoneDebasis Pradhan
36PractiTest QA Blog Joel Montvelisky
37Practical QALinda Wilkinson
38Marlena's BlogMarlena Compton
39Software Testing and moreEwald Roodenrijs, Andréas Prins
40patrickwilsonwelsh.comPatrick Wilson-Welsh
41Quality Assurance and Software Testing ( various )
42Testing Testing 1,2,3Chan Chaiyochlarb
43Mike Kelly's blogMike Kelly
44Test this Blog Eric Jacobson
45Enjoy testing Ajay Balamurugadas
46Evil TesterAlan Richardson
47Tooth of the WeaselAlan Page
48Charlie Audritsh's blogCharlie Audritsh
49Maverick Tester Anne-Marie Charrett
50Paul Gerrard's blog Paul Gerrard
51shino.deMarkus Gaertner
52Cartoon TesterAndy Glover
53cLabs BlogkiChris Morris
54Jeff Fry on TestingJeff Fry
55Venkat's BlogVenkat Reddy Chintalapudi
56Agile Testing and Process ThoughtsJanet Gregory
57Software Testing Stuff( various )
58selenadelesie.comSelena Delesie
59Software SleuthingJosh Poley
60The Software Quality Blog Vijay Bhaskar
61Expected ResultsPhil Kirkham
62One of the wolvesTim Coulter
63Musing about Software TestingKeith Stobie
64Jon Bach's blogJonathan Bach
65Quardev( various )
66Software Testing Club Blog( various )
67TestToTesterSharath Byregowda
68Agile Testing with Lisa CrispinLisa Crispin
69Confessions of a Passionate TesterDawn Cannan
70I am filled with solutionsDustin Andrews
71Software TastingGeordie Keitt
72Rosie LandRosie Sherry
73Still LifeSteve Swanson
74Brian OsmanBrian Osman
75Dhanasekar S's BlogDhanasekar S
76The Social Tester Rob Lambert
77QA InsightBrent Strange
78The Testing Blog( various )
79TestingmindedSteven Machtelinckx
80John McConda's blogJohn McConda
81Software TestingLen DiMaggio
82Jeroen's world of Software TestingJeroen Rosink
83TestingPerspectiveRahul Verma
84Adam White Adam White
85Purple Box TestingTrish Khoo
86Lessons Learned by a Software TesterPaul Carvalho
87Pliant AllianceTim Beck
88TestjutsuBen Kelly
89IlliterationJared Quinert
90Tester TestifiesRaj Kamal
91Santhosh Tuppad's BlogSanthosh Tuppad
92TeknologikaBruce McLeod
93Creative TesterAnuj Magazine
94Tester Troubles Ray Claridge
95Thoughts on QA and EngineeringJohn Overbaugh
96Quick Testing Tips( various )
97Cruisin QABrett Leonard
98QA Hates YouThe Director
99Tester Lost FocusMichelle Smith
100James McCaffrey's blogJames McCaffrey

Edit: Meanwhile some kind people have submitted blogs which I did not take into account when I created this list. They will be included in future updates.

JMeter FAQ on testing web services

Q1: The "response data writer" output file remains empty after running my JMeter test.
  • Verify the location of your input xml file on your "Webservice (SOAP) Request" controller. The location might not be valid.
  • Check if the xml content in the soap body of your input file has a valid structure. Validate the xml against its XSD.
  • Have a look at the jmeter.log file in the \bin directory of JMeter. Usually JMeter logs an error when it encounters an unexpected exception.

Q2: After having changed the input xml file, JMeter seems to send the same old xml file content with its request.
  • Uncheck the "Memory Cache" option on the "Webservice (SOAP) Request" controller. By unchecking this option you make sure that the input xml file is read each time you send the webservice request.
Q3: JMeter doesn't take my "HTTP Request Defaults" settings into account.
  • Make sure you don't overwrite the default settings with the settings on your "Webservice (SOAP) Request". Any connection setting after your "HTTP Request Defaults" gets priority.
Q4: My JMeter test result passes while the server is not running.
  • This can happen when you don't check for the server response code. To avoid this, add a response assertion checking the response code and fill in value "200" to check for. Response code 200 means the request succeeded. Next time the server is down, your response assertion checking for the response code will make your test fail.
Q5: I get a "java.lang.NoClassDefFoundError: javax/mail/MessagingException" exception when sending the SOAP Webservice request.
  • Probably you are missing some libraries.

Do you know other solutions or tips and tricks for nasty JMeter problems? Add your comments in the post comment section and help other people having a better JMeter experience

Tutorial on testing web services with Apache JMeter

This tutorial explains how to build your own Jmeter test and how to send webservice requests and validate the server response.

These days webservices are the preferred way to realize SOA (Service Oriented Architecture). Testing such interfaces in a managed way requires the correct tools. One of the better tools around is Apache Jmeter, an open source application written in Java. An important advantage is the ability to validate the server response against regular expressions. That makes this approach ideal for functional regression testing.

Preparation

Installing Jmeter

First of all, make sure you have downloaded a recent version of Jmeter. The latest version can be downloaded from http://jakarta.apache.org.

Download the zip binaries and extract them to c:\. Next rename its root folder c:\jakarta-jmeter-2.3.2 to c:\JMeter, so we are both using the same path.

Now we are ready to create a Jmeter test, so launch "\bin\jmeter.bat" to open up the JMeter interface. By default two elements are shown in the left frame.

Test Plan

On the test plan you can define variables yourself and store them for later use. Other performance related settings are available as well, but you won't need them now.

WorkBench

This is just a storage place where you can temporarily put some copied elements. Those items won't be saved when saving your JMeter test. I personally never found use for this element.

Adding elements to the Test Plan

It's time to add elements enabling us to send the webservice request.

Thread Group

--> select "Test Plan" in the left frame, right click, "Add", "Thread Group"

This component defines a pool of users that will execute your test on the server. You only need to update these properties for performance testing but now you can leave them as they are. This component is required when creating webservice requests later on, so don't delete this one.

HTTP Request Defaults

--> select "Thread Group" in the left frame, right click, "Add", "Config Element", "HTTP Request Defaults"

This element lets you set default values for any following "Request Controllers" and "Webservice Requests". I tend to always use this component as this simplifies your configuration when sending multiple requests in one Jmeter test. Fill in following fields:
Server Name or IP, e.g.: 192.168.0.1

Port Number, e.g.: 8070

Path, e.g.: /applicationName/webservices/webserviceName

WebService(SOAP) Request

--> select "Thread Group" in the left frame, right click, "Add", "Sampler", " WebService(SOAP) Request"

This component sends the Webservice Request and fetches the response. Of all configuration fields we will only use a few ones:
Filename, e.g.: c:\JmeterTests\MyFirstWebserviceRequest_input1.xml

Memory Cache, uncheck this box

Read SAP Response, check this box, otherwise you won't be able to log the response content of the server

Note: It's important that you uncheck the "Memory Cache" box. If you leave it checked and you change something inside your file to send to the server, JMeter will not send the update. Instead the original version of your file will be used until you close and reopen JMeter.

Make sure the xml in your input file contains a soap envelope. Include your xml content in a soap envelope if this has not been done yet. Probably in that case it will look like this:
  1. <?xml version="1.0" encoding="utf-8"?>  
  2. <webserviceFunctionality xmlns........>...</webserviceFunctionality>  

If you correctly embedded your xml message in a soap envelope, then your xml file should look like this:
  1. <?xml version="1.0" encoding="utf-8"?>  
  2. <soap:Envelope xmlns:xsi="http://www.w3.org/2001/XMLSchema-instance" xmlns:xsd="http://www.w3.org/2001/XMLSchema" xmlns:soap="http://schemas.xmlsoap.org/soap/envelope/">  
  3. <soap:Body>  
  4. <webserviceFunctionality xmlns........</webserviceFunctionality>  
  5. </soap:Body>  
  6. </soap:Envelope>  

Now we want to be able to validate the response coming from the server by adding response assertions.
--> select "WebService(SOAP) Request" in the left frame, right click, "Add", "Assertions", "Response Assertion"

On this first response assertion, select "Response Code" as response field to test and select "Matching" as pattern matching rule. Next add a pattern to test by clicking the "Add" button and filling the new pattern to test entry with value 200. By adding this assertion we are sure that the server is up and running. Only functionally testing on the responsetext is not sufficient, as there may be situations in which the assertion result returns true (or OK) while the server is not even running; e.g.: checking that the text response does not contain a certain value.
--> select "WebService(SOAP) Request" in the left frame, right click, "Add", "Assertions", "Response Assertion"

On this second response assertion, select "Text Response" as response field to test and select "Contains" as pattern matching rule. Next add a pattern to test by clicking the "Add" button and filling the new pattern to test entry with any value which you expect the server to return. This makes part of the functional verification. JMeter supports regular expressions, so you may want to use them. Regular expressions are a powerful way of comparing the result text.

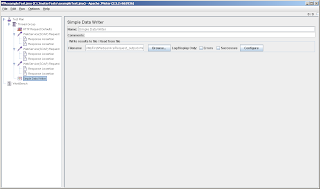
Simple Data Writer

Finally we add a control which will write the server response to a file.
--> select "Thread Group" in the left frame, right click, "Add", "Listener", "Simple Data Writer"

Fill in following fields:
Filename e.g.: c:\JmeterTests\MyFirstWebserviceRequest_output.xml

Next click "configure" and thick all checkboxes. This will slow down the performance of your test but this way you will have as much information as possible at your disposition in order to write the response file. If in the future you feel like getting too much information, you can uncheck checkboxes of items you don't need in your response file.

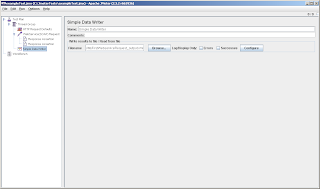
If you've correctly added all components, your JMeter window looks as follows:


Running the test

Now you're ready to run your test. First save your Jmeter test at a location of your choice. Next select "Start" under the "Run" menu. The test runs until there's no more green light at the right top of your JMeter window. When the test has run, check the server response which has been written to c:\WebserviceTestingOutputFiles\MyFirstWebserviceRequest.xml.

You can add more webservice requests to this test, having their own response assertions and writing their response still to the same output file.
--> select "WebService(SOAP) Request" in the left frame, right click, "Copy", select "Thread Group", right click, "Paste", next move the newly added "WebService(SOAP) Request" on top of your "Simple Data Writer" and select "Insert Before".

If you've added more webservice requests to this test, your Jmeter window could look as follows:


If you need help interpreting the server results or with any other aspect of testing webservices with Jmeter, then just drop a note. I'll answer as soon as possible.

Feel free to share your experiences or opinion on this article by adding a comment. Any suggestions / ideas for this or an other tutorial are welcome.

Tutorial: functional testing with JMeter - part 3

This article makes part of a series of articles. The other parts can be reached through following article links:
  • Introduction
  • part 1 - Using JMeter components
  • part 2 - Recording http requests

Running the Test

Once the assertions are properly completed, we are expecting that running our Test Plan would pass all the assertions. Passed assertions will not show any error in Assertion Results | Listener installed within the same scope. As for all Listeners, results as captured by the Listeners can be saved and reproduced at a later time. Following is a sample explaining what passed Assertions would reveal as the Test is executed.

JMeterAssertionResultsListener
On the other hand, a failed Assertion would show an error message in the same Listener as the following snapshot illustrates.

JMeterAssertionResultsListener
Since a page error or Page not found error is a real risk in web applications, a failure may originate from such an error, and not just because of a failed Assertion. We can view more information about the sampler that contains the failed Assertion to investigate the origins of a failure. A View Results Tree Listener records the details of requests and logs all errors (indicated by the red warning sign and red fonts).The following figure shows that the page was available and page request was successful, however, the assertion failed.

JMeterResultsTree
Summary

This article helps you to understand the capabilities of JMeter tools that support functional testing, as we directly wrote and implemented a JMeter script. We have demonstrated building a Test Plan to contain functional validations (or assertions) by incorporating various essential JMeter components, particularly the 'Response Assertion' element and 'Assertion Result' Listener. By using the 'User Defined Variable' Configuration element, we have also parameterized several values in order to give our Test Plan better flexibility. In addition, we have observed the result of these assertions as we performed a 'live' run of the application under test. An HTTP Request sampler may require to be modified, if there are any changes to the parameter(s) that the sampler sends with each request. Once created, a JMeter Test Plan that contains assertions can then be used and modified in subsequent Regression tests for the application.

Tutorial: functional testing with JMeter - part 2

This article makes part of a series of articles. The other parts can be reached through following article links:
  • Introduction
  • part 1 - Using JMeter components
  • part 3 - Recording http requests

Let the Recording Begin...

Let us proceed with the recording following the test cases in the previous table as our guide. As you record each page, select the specific tags or page elements of which you want to validate the correctness and add them to the Patterns to Test section in the Response Assertion element of each sampler. This may take most of your recording time, since as you record, you need to decide carefully which page element(s) would be the most effective measure of correctness.

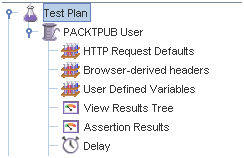
There are plenty of developer tools available to help you in this possibly tedious task. My favorite is the Inspect Element feature in Firebug, a Firefox browser add-on by Mozilla. You may choose patterns that you would expect to see or which you don't want to see by selecting or de-selecting the Not option at Pattern Matching Rules section. After recording is completed, you may rename and organize your samplers, as you move them to the Test Plan (refer to the following figure). You may want to add a few more Configuration elements in your Test Plan, as in my sample shown in the following snapshot:

JMeterTestPlan
User Defined Variables have been added, two more Listeners, and a Constant Timer with a constant delay of 2 seconds after the request for each page was completed. The Assertion Results listener is used with the Response Assertion elements, to summarize the success or failure of a page in meeting the validation criteria defined in each Response Assertion.


Adding User Defined Variables

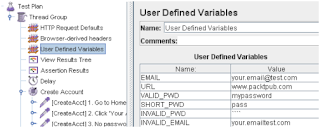
The User Defined Variables (UDV) element as shown in the following snapshot is particularly interesting with regards to the test case design we drafted earlier in the table. It allows you to plug values to variables being used in various locations in the Test Plan. The JMeter Test Plan we have created will implement the exact values assigned to different variables. Following is a snapshot of the UDV I have set up for our Test Plan.

JMeterUserDefinedVariables

How do we use these variables in the Test Plan? Simply use the format ${Variable-name} anywhere in the Test Plan that we want to use the value of a Variable. For example, in the HTTP Request Sampler following CREATE ACCOUNT | Test Step#6: Register Valid User, as you can see below, the parameter password has value ${VALID_PWD}, referring to the corresponding variable assigned in UDV.

JMeterCallUserDefinedVariables

We may also use the variables set in UDV in other elements, namely Response Assertions. This feature is particularly useful when the assertion depends on varying values, such as when we want to verify URLs, verifying user names, account no, etc.—depending on the values we want to include throughout the entire testing. The following snapshot may give us a clear idea of how a UDV can be used in an Assertion element. The URL variable defined in UDV is used in the Patterns to Test section of this Assertion, as part of a complete page element that we want to verify in the page Sampler.

JMeterResponseAssertion

Continue to part 3: Running the test and validating the response

Tutorial: functional testing with JMeter - part 1

This article makes part of a series of articles. The other parts can be reached through following article links:
  • Introduction
  • part 2 - Recording http requests
  • part 3 - Running the test and validating the response

Using JMeter Components

We will create a Test Plan in order to demonstrate how we can configure the Test Plan to include functional testing capabilities. The modified Test Plan will include these scenarios:

  1. Create Account—New Visitor creating an Account
  2. Login User—User logging in to an Account
Following these scenarios, we will simulate various entries and form submission as a request to a page is made, while checking the correct page response to these user entries. We will add assertions to the samples following these scenarios to verify the 'correctness' of a requested page. In this manner, we can see if the pages responded correctly to invalid data.

For example, we would like to check that the page responded with the correct warning message when a user enters an invalid password, or whether a request returns the correct page.
First of all, we will create a series of test cases following the various user actions in each scenario. The test cases may be designed as follows:

Create Account


Logon User


With the exception of the Configuration elements, Listeners, and Assertions, which we will add later, our Test Plan will take the form that you see in the following screenshot:

JMeterTestPlan
Using HTTP Proxy Server to Record Page Requests

You will need to include the HTTP Proxy Server element in the WorkBench. Some configuration will be required, as shown in the following snapshot:

JMeterProxyElement
Configuring the Proxy Server

Simulating Create Account and Login User scenarios will require JMeter to make requests for the registration and login pages that are exposed via HTTPS. By default, HTTP Proxy Server is unable to record HTTP requests. However, we can override this by selecting (checking) the Attempt HTTPS Spoofing checkbox. Selecting Add Assertion will be especially useful as we add specific patterns of the page that we want to evaluate as a later part of this exercise. The Capture HTTP Headers option is selected to capture the Header information as we begin recording. However, to make the recording neater, we will keep this option unchecked. In addition, since we do not require images in our testing, in the URL Pattern to Exclude section, add these patterns: .*.jpg, .*.js, .*.png, .*.gif', .*.ico, .*.css, otherwise these image files, which are not necessary for our testing, will be recorded causing unnecessary clutter in our recording.

Adding HTTP Request Default


A useful addition to this element is the HTTP Request Default element, a type of Configuration element. Since this Test Plan will employ multiple HTTP request elements targeting the same server and port, this element will be very useful. The web server name will not be captured for each HTTP Request sampler record, since the Request Default element will retain this information. With a little configuration change in this element, it allows the Test Plan to run even when the application is the deployed to a different server and/or port. The following snapshot is the HTTP Request Default element that we will use for this exercise.

JMeterHttpRequestDefaults
As we use this default element, our subsequent recording never needs to append the Server name. The result of our recording of the first page is shown in the following snapshot:

JMeterHttpRequestDefaults
Adding HTTP Header Manager

Another very useful default element is the HTTP Header Manager Configuration element. This element can either be added to the Test Plan and configured manually as an afterthought, or we can simply use the recorded Browser-derived headers element as included in the recording. For convenience, we will choose the latter option. Once the Proxy Server records the homepage request, stop the recording. You will find a Header Manager for this page is being captured, as Browser-derived header. Simply click and drag this element to the top of the current scope of the HTTP Proxy Server. Notice that I have removed the Referer, since we want to create a default for the remaining HTTP Requests. Following is a snapshot of this change.

JMeterHttpHeaderManager
Now, you may de-select the Capture HTTP Headers option in the Proxy Server element, since we have the default header.


Continue to part 2: Recording http requests