Here it is at last: my first Top 100 of Software Testing Blogs. For those who would like to read more on Software Testing and QA, I created a list with 100 of the best - or at least most popular - Software Testing Blogs in the world. This should definitely give you enough reading!
I ordered this list by gathering several metrics of each blog, to be more precise: the Google Pagerank, Alexa Popularity, Technorati Authority, number of comments and number of sites linking to it.(Note: Not all statistics were available for each blog. Where a statistic was missing, the blog in question simply scored 'neutral' for that statistic). You can read the algorythm I used to rank the blogs at noop.nl. Many of the results were gathered automatically using my Pagerank Checking script.
Enjoy the list and please let me know which blogs I forgot!
Edit: Meanwhile some kind people have submitted blogs which I did not take into account when I created this list. They will be included in future updates.
Friday, June 18, 2010
JMeter FAQ on testing web services
Q1: The "response data writer" output file remains empty after running my JMeter test.
Q2: After having changed the input xml file, JMeter seems to send the same old xml file content with its request.
Do you know other solutions or tips and tricks for nasty JMeter problems? Add your comments in the post comment section and help other people having a better JMeter experience
- Verify the location of your input xml file on your "Webservice (SOAP) Request" controller. The location might not be valid.
- Check if the xml content in the soap body of your input file has a valid structure. Validate the xml against its XSD.
- Have a look at the jmeter.log file in the \bin directory of JMeter. Usually JMeter logs an error when it encounters an unexpected exception.
Q2: After having changed the input xml file, JMeter seems to send the same old xml file content with its request.
- Uncheck the "Memory Cache" option on the "Webservice (SOAP) Request" controller. By unchecking this option you make sure that the input xml file is read each time you send the webservice request.
- Make sure you don't overwrite the default settings with the settings on your "Webservice (SOAP) Request". Any connection setting after your "HTTP Request Defaults" gets priority.
- This can happen when you don't check for the server response code. To avoid this, add a response assertion checking the response code and fill in value "200" to check for. Response code 200 means the request succeeded. Next time the server is down, your response assertion checking for the response code will make your test fail.
- Probably you are missing some libraries.
Do you know other solutions or tips and tricks for nasty JMeter problems? Add your comments in the post comment section and help other people having a better JMeter experience
Tutorial on testing web services with Apache JMeter
This tutorial explains how to build your own Jmeter test and how to send webservice requests and validate the server response.
These days webservices are the preferred way to realize SOA (Service Oriented Architecture). Testing such interfaces in a managed way requires the correct tools. One of the better tools around is Apache Jmeter, an open source application written in Java. An important advantage is the ability to validate the server response against regular expressions. That makes this approach ideal for functional regression testing.
Download the zip binaries and extract them to c:\. Next rename its root folder c:\jakarta-jmeter-2.3.2 to c:\JMeter, so we are both using the same path.
Now we are ready to create a Jmeter test, so launch "\bin\jmeter.bat" to open up the JMeter interface. By default two elements are shown in the left frame.
This component defines a pool of users that will execute your test on the server. You only need to update these properties for performance testing but now you can leave them as they are. This component is required when creating webservice requests later on, so don't delete this one.
This element lets you set default values for any following "Request Controllers" and "Webservice Requests". I tend to always use this component as this simplifies your configuration when sending multiple requests in one Jmeter test. Fill in following fields:
This component sends the Webservice Request and fetches the response. Of all configuration fields we will only use a few ones:
Note: It's important that you uncheck the "Memory Cache" box. If you leave it checked and you change something inside your file to send to the server, JMeter will not send the update. Instead the original version of your file will be used until you close and reopen JMeter.
Make sure the xml in your input file contains a soap envelope. Include your xml content in a soap envelope if this has not been done yet. Probably in that case it will look like this:
If you correctly embedded your xml message in a soap envelope, then your xml file should look like this:
Now we want to be able to validate the response coming from the server by adding response assertions.
On this first response assertion, select "Response Code" as response field to test and select "Matching" as pattern matching rule. Next add a pattern to test by clicking the "Add" button and filling the new pattern to test entry with value 200. By adding this assertion we are sure that the server is up and running. Only functionally testing on the responsetext is not sufficient, as there may be situations in which the assertion result returns true (or OK) while the server is not even running; e.g.: checking that the text response does not contain a certain value.
On this second response assertion, select "Text Response" as response field to test and select "Contains" as pattern matching rule. Next add a pattern to test by clicking the "Add" button and filling the new pattern to test entry with any value which you expect the server to return. This makes part of the functional verification. JMeter supports regular expressions, so you may want to use them. Regular expressions are a powerful way of comparing the result text.
Fill in following fields:
Next click "configure" and thick all checkboxes. This will slow down the performance of your test but this way you will have as much information as possible at your disposition in order to write the response file. If in the future you feel like getting too much information, you can uncheck checkboxes of items you don't need in your response file.
If you've correctly added all components, your JMeter window looks as follows:
You can add more webservice requests to this test, having their own response assertions and writing their response still to the same output file.
If you've added more webservice requests to this test, your Jmeter window could look as follows:
If you need help interpreting the server results or with any other aspect of testing webservices with Jmeter, then just drop a note. I'll answer as soon as possible.
Feel free to share your experiences or opinion on this article by adding a comment. Any suggestions / ideas for this or an other tutorial are welcome.
These days webservices are the preferred way to realize SOA (Service Oriented Architecture). Testing such interfaces in a managed way requires the correct tools. One of the better tools around is Apache Jmeter, an open source application written in Java. An important advantage is the ability to validate the server response against regular expressions. That makes this approach ideal for functional regression testing.
Preparation
Installing Jmeter
First of all, make sure you have downloaded a recent version of Jmeter. The latest version can be downloaded from http://jakarta.apache.org.Download the zip binaries and extract them to c:\. Next rename its root folder c:\jakarta-jmeter-2.3.2 to c:\JMeter, so we are both using the same path.
Now we are ready to create a Jmeter test, so launch "\bin\jmeter.bat" to open up the JMeter interface. By default two elements are shown in the left frame.
Test Plan
On the test plan you can define variables yourself and store them for later use. Other performance related settings are available as well, but you won't need them now.WorkBench
This is just a storage place where you can temporarily put some copied elements. Those items won't be saved when saving your JMeter test. I personally never found use for this element.Adding elements to the Test Plan
It's time to add elements enabling us to send the webservice request.Thread Group
--> select "Test Plan" in the left frame, right click, "Add", "Thread Group"
This component defines a pool of users that will execute your test on the server. You only need to update these properties for performance testing but now you can leave them as they are. This component is required when creating webservice requests later on, so don't delete this one.
HTTP Request Defaults
--> select "Thread Group" in the left frame, right click, "Add", "Config Element", "HTTP Request Defaults"
This element lets you set default values for any following "Request Controllers" and "Webservice Requests". I tend to always use this component as this simplifies your configuration when sending multiple requests in one Jmeter test. Fill in following fields:
Server Name or IP, e.g.: 192.168.0.1
Port Number, e.g.: 8070
Path, e.g.: /applicationName/webservices/webserviceName
WebService(SOAP) Request
--> select "Thread Group" in the left frame, right click, "Add", "Sampler", " WebService(SOAP) Request"
This component sends the Webservice Request and fetches the response. Of all configuration fields we will only use a few ones:
Filename, e.g.: c:\JmeterTests\MyFirstWebserviceRequest_input1.xml
Memory Cache, uncheck this box
Read SAP Response, check this box, otherwise you won't be able to log the response content of the server
Note: It's important that you uncheck the "Memory Cache" box. If you leave it checked and you change something inside your file to send to the server, JMeter will not send the update. Instead the original version of your file will be used until you close and reopen JMeter.
Make sure the xml in your input file contains a soap envelope. Include your xml content in a soap envelope if this has not been done yet. Probably in that case it will look like this:
- <?xml version="1.0" encoding="utf-8"?>
- <webserviceFunctionality xmlns........>...</webserviceFunctionality>
If you correctly embedded your xml message in a soap envelope, then your xml file should look like this:
- <?xml version="1.0" encoding="utf-8"?>
- <soap:Envelope xmlns:xsi="http://www.w3.org/2001/XMLSchema-instance" xmlns:xsd="http://www.w3.org/2001/XMLSchema" xmlns:soap="http://schemas.xmlsoap.org/soap/envelope/">
- <soap:Body>
- <webserviceFunctionality xmlns........</webserviceFunctionality>
- </soap:Body>
- </soap:Envelope>
Now we want to be able to validate the response coming from the server by adding response assertions.
--> select "WebService(SOAP) Request" in the left frame, right click, "Add", "Assertions", "Response Assertion"
On this first response assertion, select "Response Code" as response field to test and select "Matching" as pattern matching rule. Next add a pattern to test by clicking the "Add" button and filling the new pattern to test entry with value 200. By adding this assertion we are sure that the server is up and running. Only functionally testing on the responsetext is not sufficient, as there may be situations in which the assertion result returns true (or OK) while the server is not even running; e.g.: checking that the text response does not contain a certain value.
--> select "WebService(SOAP) Request" in the left frame, right click, "Add", "Assertions", "Response Assertion"
On this second response assertion, select "Text Response" as response field to test and select "Contains" as pattern matching rule. Next add a pattern to test by clicking the "Add" button and filling the new pattern to test entry with any value which you expect the server to return. This makes part of the functional verification. JMeter supports regular expressions, so you may want to use them. Regular expressions are a powerful way of comparing the result text.
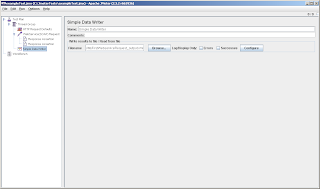
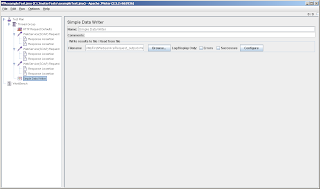
Simple Data Writer
Finally we add a control which will write the server response to a file.--> select "Thread Group" in the left frame, right click, "Add", "Listener", "Simple Data Writer"
Fill in following fields:
Filename e.g.: c:\JmeterTests\MyFirstWebserviceRequest_output.xml
Next click "configure" and thick all checkboxes. This will slow down the performance of your test but this way you will have as much information as possible at your disposition in order to write the response file. If in the future you feel like getting too much information, you can uncheck checkboxes of items you don't need in your response file.
If you've correctly added all components, your JMeter window looks as follows:

Running the test
Now you're ready to run your test. First save your Jmeter test at a location of your choice. Next select "Start" under the "Run" menu. The test runs until there's no more green light at the right top of your JMeter window. When the test has run, check the server response which has been written to c:\WebserviceTestingOutputFiles\MyFirstWebserviceRequest.xml.You can add more webservice requests to this test, having their own response assertions and writing their response still to the same output file.
--> select "WebService(SOAP) Request" in the left frame, right click, "Copy", select "Thread Group", right click, "Paste", next move the newly added "WebService(SOAP) Request" on top of your "Simple Data Writer" and select "Insert Before".
If you've added more webservice requests to this test, your Jmeter window could look as follows:

If you need help interpreting the server results or with any other aspect of testing webservices with Jmeter, then just drop a note. I'll answer as soon as possible.
Feel free to share your experiences or opinion on this article by adding a comment. Any suggestions / ideas for this or an other tutorial are welcome.
Tutorial: functional testing with JMeter - part 3
This article makes part of a series of articles. The other parts can be reached through following article links:
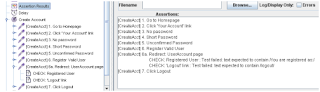
Running the Test
Once the assertions are properly completed, we are expecting that running our Test Plan would pass all the assertions. Passed assertions will not show any error in Assertion Results | Listener installed within the same scope. As for all Listeners, results as captured by the Listeners can be saved and reproduced at a later time. Following is a sample explaining what passed Assertions would reveal as the Test is executed.

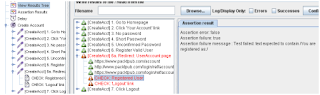
On the other hand, a failed Assertion would show an error message in the same Listener as the following snapshot illustrates.
Since a page error or Page not found error is a real risk in web applications, a failure may originate from such an error, and not just because of a failed Assertion. We can view more information about the sampler that contains the failed Assertion to investigate the origins of a failure. A View Results Tree Listener records the details of requests and logs all errors (indicated by the red warning sign and red fonts).The following figure shows that the page was available and page request was successful, however, the assertion failed.
Summary
This article helps you to understand the capabilities of JMeter tools that support functional testing, as we directly wrote and implemented a JMeter script. We have demonstrated building a Test Plan to contain functional validations (or assertions) by incorporating various essential JMeter components, particularly the 'Response Assertion' element and 'Assertion Result' Listener. By using the 'User Defined Variable' Configuration element, we have also parameterized several values in order to give our Test Plan better flexibility. In addition, we have observed the result of these assertions as we performed a 'live' run of the application under test. An HTTP Request sampler may require to be modified, if there are any changes to the parameter(s) that the sampler sends with each request. Once created, a JMeter Test Plan that contains assertions can then be used and modified in subsequent Regression tests for the application.
- Introduction
- part 1 - Using JMeter components
- part 2 - Recording http requests
Running the Test
Once the assertions are properly completed, we are expecting that running our Test Plan would pass all the assertions. Passed assertions will not show any error in Assertion Results | Listener installed within the same scope. As for all Listeners, results as captured by the Listeners can be saved and reproduced at a later time. Following is a sample explaining what passed Assertions would reveal as the Test is executed.
On the other hand, a failed Assertion would show an error message in the same Listener as the following snapshot illustrates.
Since a page error or Page not found error is a real risk in web applications, a failure may originate from such an error, and not just because of a failed Assertion. We can view more information about the sampler that contains the failed Assertion to investigate the origins of a failure. A View Results Tree Listener records the details of requests and logs all errors (indicated by the red warning sign and red fonts).The following figure shows that the page was available and page request was successful, however, the assertion failed.
Summary
This article helps you to understand the capabilities of JMeter tools that support functional testing, as we directly wrote and implemented a JMeter script. We have demonstrated building a Test Plan to contain functional validations (or assertions) by incorporating various essential JMeter components, particularly the 'Response Assertion' element and 'Assertion Result' Listener. By using the 'User Defined Variable' Configuration element, we have also parameterized several values in order to give our Test Plan better flexibility. In addition, we have observed the result of these assertions as we performed a 'live' run of the application under test. An HTTP Request sampler may require to be modified, if there are any changes to the parameter(s) that the sampler sends with each request. Once created, a JMeter Test Plan that contains assertions can then be used and modified in subsequent Regression tests for the application.
Tutorial: functional testing with JMeter - part 2
This article makes part of a series of articles. The other parts can be reached through following article links:
Let the Recording Begin...
Let us proceed with the recording following the test cases in the previous table as our guide. As you record each page, select the specific tags or page elements of which you want to validate the correctness and add them to the Patterns to Test section in the Response Assertion element of each sampler. This may take most of your recording time, since as you record, you need to decide carefully which page element(s) would be the most effective measure of correctness.
There are plenty of developer tools available to help you in this possibly tedious task. My favorite is the Inspect Element feature in Firebug, a Firefox browser add-on by Mozilla. You may choose patterns that you would expect to see or which you don't want to see by selecting or de-selecting the Not option at Pattern Matching Rules section. After recording is completed, you may rename and organize your samplers, as you move them to the Test Plan (refer to the following figure). You may want to add a few more Configuration elements in your Test Plan, as in my sample shown in the following snapshot:
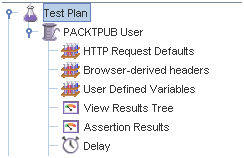
User Defined Variables have been added, two more Listeners, and a Constant Timer with a constant delay of 2 seconds after the request for each page was completed. The Assertion Results listener is used with the Response Assertion elements, to summarize the success or failure of a page in meeting the validation criteria defined in each Response Assertion.
Adding User Defined Variables
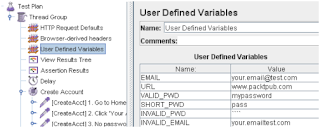
The User Defined Variables (UDV) element as shown in the following snapshot is particularly interesting with regards to the test case design we drafted earlier in the table. It allows you to plug values to variables being used in various locations in the Test Plan. The JMeter Test Plan we have created will implement the exact values assigned to different variables. Following is a snapshot of the UDV I have set up for our Test Plan.
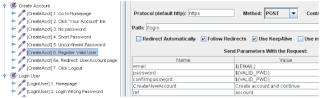
How do we use these variables in the Test Plan? Simply use the format ${Variable-name} anywhere in the Test Plan that we want to use the value of a Variable. For example, in the HTTP Request Sampler following CREATE ACCOUNT | Test Step#6: Register Valid User, as you can see below, the parameter password has value ${VALID_PWD}, referring to the corresponding variable assigned in UDV.
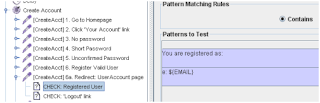
We may also use the variables set in UDV in other elements, namely Response Assertions. This feature is particularly useful when the assertion depends on varying values, such as when we want to verify URLs, verifying user names, account no, etc.—depending on the values we want to include throughout the entire testing. The following snapshot may give us a clear idea of how a UDV can be used in an Assertion element. The URL variable defined in UDV is used in the Patterns to Test section of this Assertion, as part of a complete page element that we want to verify in the page Sampler.
Continue to part 3: Running the test and validating the response
- Introduction
- part 1 - Using JMeter components
- part 3 - Recording http requests
Let the Recording Begin...
Let us proceed with the recording following the test cases in the previous table as our guide. As you record each page, select the specific tags or page elements of which you want to validate the correctness and add them to the Patterns to Test section in the Response Assertion element of each sampler. This may take most of your recording time, since as you record, you need to decide carefully which page element(s) would be the most effective measure of correctness.
There are plenty of developer tools available to help you in this possibly tedious task. My favorite is the Inspect Element feature in Firebug, a Firefox browser add-on by Mozilla. You may choose patterns that you would expect to see or which you don't want to see by selecting or de-selecting the Not option at Pattern Matching Rules section. After recording is completed, you may rename and organize your samplers, as you move them to the Test Plan (refer to the following figure). You may want to add a few more Configuration elements in your Test Plan, as in my sample shown in the following snapshot:
User Defined Variables have been added, two more Listeners, and a Constant Timer with a constant delay of 2 seconds after the request for each page was completed. The Assertion Results listener is used with the Response Assertion elements, to summarize the success or failure of a page in meeting the validation criteria defined in each Response Assertion.
Adding User Defined Variables
The User Defined Variables (UDV) element as shown in the following snapshot is particularly interesting with regards to the test case design we drafted earlier in the table. It allows you to plug values to variables being used in various locations in the Test Plan. The JMeter Test Plan we have created will implement the exact values assigned to different variables. Following is a snapshot of the UDV I have set up for our Test Plan.
How do we use these variables in the Test Plan? Simply use the format ${Variable-name} anywhere in the Test Plan that we want to use the value of a Variable. For example, in the HTTP Request Sampler following CREATE ACCOUNT | Test Step#6: Register Valid User, as you can see below, the parameter password has value ${VALID_PWD}, referring to the corresponding variable assigned in UDV.
We may also use the variables set in UDV in other elements, namely Response Assertions. This feature is particularly useful when the assertion depends on varying values, such as when we want to verify URLs, verifying user names, account no, etc.—depending on the values we want to include throughout the entire testing. The following snapshot may give us a clear idea of how a UDV can be used in an Assertion element. The URL variable defined in UDV is used in the Patterns to Test section of this Assertion, as part of a complete page element that we want to verify in the page Sampler.
Continue to part 3: Running the test and validating the response
Tutorial: functional testing with JMeter - part 1


Subscribe to:
Comments (Atom)